Cool Blue Gradient Content Headers, Buttons and Tabs
Difficulty: Advanced
Create cool gradient content headers, buttons and tabs in a few simple steps.
 Content Headers and Buttons

Tabs
A. Content Headers and Buttons
Note: This my very first tutorial so please-please try to be patient with me! Should you need clarifications or more help with this tutorials do not hesitate to contact me.
1. Let's start then! Open a new document 200x200 pixels with white background.
2. Set your Foreground colour to #2A7EC6. Grab your Round Rectangle Tool, set it to the Fill Pixels mode and draw a rounded rectangle about 240x40 pixels or any dimensions you are happy with. Name this layer Header_Body.
3. CTRL+click on the Header_Body layer to select it. Set your Foreground colour to #0E4C80. Create a new layer and name it Gradient. Now take your Gradient Tool and set it to the Foreground to Transparent mode. Start a gradient from top to bottom as shown in the image below (keep SHIFT pressed while you are making the gradient in order to keep it straight).
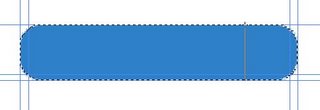
4. Now comes the hardest part but also the most important one. Grab your Pen Tool, set it to Paths mode and start a path from the upper right part and then to lower left part to continue at the bottom right corner to the right upper corner and close at the point you started. Change to Convert Point Tool and try to form a wavy shape as shown below. Note that you can always change the position of your anchors by means of the Direct Selection Tool-I had to make some small changes to "catch" the right (!) wave ;o).
As soon as you're finished right-click on the path and select it (Make Selection). Set the Feather Radius to 0 pixels. Press CTRL+SHIFT+I to inverse the selection and hit delete.
5. And now the fun begins! While you are on the Gradient layer make sure that the Header_Body layer is just below that and press CTRL+E to merge down. Name the merged layer you created Header_Full.
6. In the new layer (Header_Full) apply the following styles: b) Inner Shadow: Multiply #000000, Opacity: 15%, 120o, Use Global Light: checked, Distance: 2 pixels,Choke: 0 pixels, Size: 2 pixels,Quality: Contour: Gaussian Blur, Anti-Aliased: UNCHECKED, Noise: 0%.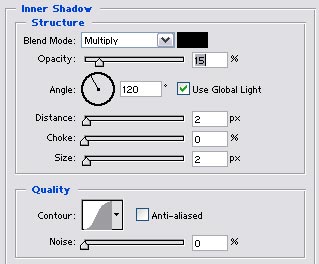
2. Create a new layer and change its name into Tab_Body.
3. Grab your Rectangular Marquee Tool and draw a rectangle 100x30 pixels or any dimensions you are happy with. Keep your selection, set your Foreground colour to #2A7EC6 and your Background colout to #7BAEDA. Then with your Gradient Tool set to Foreground to Backgound mode draw a top-to-bottom gradient. Keep your selection!
4. To make the left and right bottom corners smoother grab your Lasso Tool set it to Substract From Selection mode and draw a triangle first to left bottom corner and then to right bottom corner. Hit CTRL+SHIFT+I to invert your selection and delete the new selection. Now CTRL+D to deselect.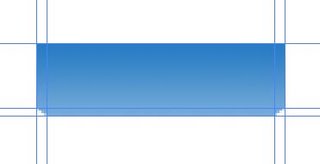
5. Take your Rectangular Marquee Tool again and select a 6-pixels-wide part of your rectangular, cut it (CTRL+X) and paste it (CTRL+V) on a new layer. Name this layer Right_End.
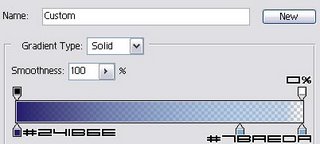
6. Activate the Tab_Body layer again and add a Stroke with the following settings: Size: 3 pixels, Position: Inside, Blend Mode: Normal, Opacity: 100%, File Type: Gradient (#241B6E, #7BAEDA, #7BAEDA (opacity 0%)), Style: Linear, Align with Layer: checked, Angle: 23o, Scale: 100%.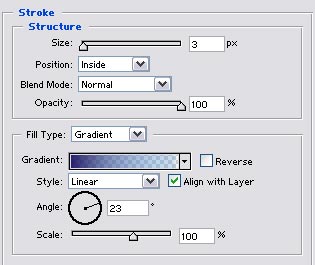
8. Now with your Elliptical Marquee Tool set to the Substract From Selection mode draw a circle to cover the most of the tab but leaving the lower right part out (see image below).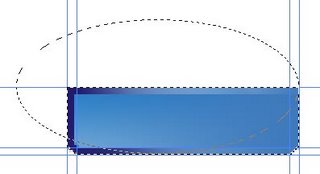 Again with your Elliptical Marquee Tool make a small circle to select a small part on the left so that you will be left with the right bottom selection only.
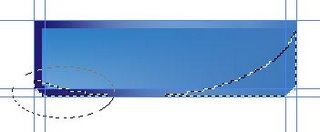 Press CTRL+SHIFT+I to inverse your selection and hit delete to clear the unwanted part of the gradient.
9. We almost there! CTRL+click on the Tab_Body layer to select it. Create a new layer and name it Gray_Stroke and put it under the Tab_Body layer. Expand your selection by 5 pixels (Select/Modify/Expand). Fill your selection with #E4E4E4.
10. Flatten your image (Layer/Flatten Image). Grab your Rectangular Marquee Tool and select the upper part of the tab strokes like in the image below.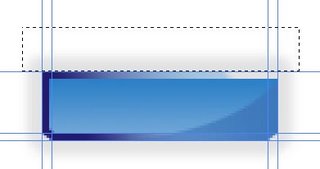 Hit delete to get rid of the selection and then CTRL+D to deselect and you are ready!!!
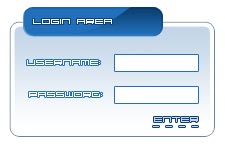
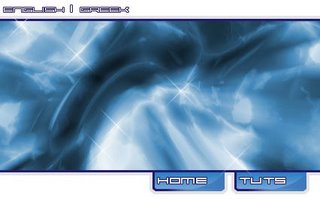
This is my end result with an added navigation.
Create cool gradient content headers, buttons and tabs in a few simple steps.
 Content Headers and Buttons
Tabs
A. Content Headers and Buttons
Note: This my very first tutorial so please-please try to be patient with me! Should you need clarifications or more help with this tutorials do not hesitate to contact me.
1. Let's start then! Open a new document 200x200 pixels with white background.
2. Set your Foreground colour to #2A7EC6. Grab your Round Rectangle Tool, set it to the Fill Pixels mode and draw a rounded rectangle about 240x40 pixels or any dimensions you are happy with. Name this layer Header_Body.
3. CTRL+click on the Header_Body layer to select it. Set your Foreground colour to #0E4C80. Create a new layer and name it Gradient. Now take your Gradient Tool and set it to the Foreground to Transparent mode. Start a gradient from top to bottom as shown in the image below (keep SHIFT pressed while you are making the gradient in order to keep it straight).

4. Now comes the hardest part but also the most important one. Grab your Pen Tool, set it to Paths mode and start a path from the upper right part and then to lower left part to continue at the bottom right corner to the right upper corner and close at the point you started.
 Change to Convert Point Tool and try to form a wavy shape as shown below. Note that you can always change the position of your anchors by means of the Direct Selection Tool-I had to make some small changes to "catch" the right (!) wave ;o).
5. And now the fun begins! While you are on the Gradient layer make sure that the Header_Body layer is just below that and press CTRL+E to merge down. Name the merged layer you created Header_Full.
6. In the new layer (Header_Full) apply the following styles:
a) Bevel & Emboss: Inner Bevel, Technique: Smooth, Depth: 100%, Direction: Up, Size: 2 pixels, Soften: 0 pixels, Angle: 120o, Use Global Light: chacked, Altitude: 30o, Gloss Contour: Cove-Deep, Anti-Aliased: UNCHECKED, Highlight Mode: Soft Light #ffffff, Opacity: 85o, Shadow Mode: Soft Light #000000, Opacity: 90%.


And your are ready!!!This is my end result with some add-ons.

B. Tabs
1. Open a new document 200x200 pixels with white background.
2. Create a new layer and change its name into Tab_Body.
3. Grab your Rectangular Marquee Tool and draw a rectangle 100x30 pixels or any dimensions you are happy with. Keep your selection, set your Foreground colour to #2A7EC6 and your Background colout to #7BAEDA. Then with your Gradient Tool set to Foreground to Backgound mode draw a top-to-bottom gradient. Keep your selection!
4. To make the left and right bottom corners smoother grab your Lasso Tool set it to Substract From Selection mode and draw a triangle first to left bottom corner and then to right bottom corner. Hit CTRL+SHIFT+I to invert your selection and delete the new selection. Now CTRL+D to deselect.

5. Take your Rectangular Marquee Tool again and select a 6-pixels-wide part of your rectangular, cut it (CTRL+X) and paste it (CTRL+V) on a new layer. Name this layer Right_End.
6. Activate the Tab_Body layer again and add a Stroke with the following settings: Size: 3 pixels, Position: Inside, Blend Mode: Normal, Opacity: 100%, File Type: Gradient (#241B6E, #7BAEDA, #7BAEDA (opacity 0%)), Style: Linear, Align with Layer: checked, Angle: 23o, Scale: 100%.


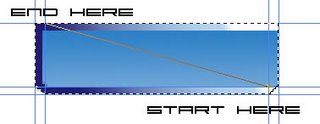
7. Create a new layer and name it Gradient. CTL+click on the Tab_Body layer to make a selection. Grab the Gradient Tool and set it to Foreground to Transparent. Change your Foreground colour to #407ABC and draw a gradient starting from the bottom right corner to the left top corner like in the image shown below.

8. Now with your Elliptical Marquee Tool set to the Substract From Selection mode draw a circle to cover the most of the tab but leaving the lower right part out (see image below).
 Again with your Elliptical Marquee Tool make a small circle to select a small part on the left so that you will be left with the right bottom selection only.
 Press CTRL+SHIFT+I to inverse your selection and hit delete to clear the unwanted part of the gradient.
9. We almost there! CTRL+click on the Tab_Body layer to select it. Create a new layer and name it Gray_Stroke and put it under the Tab_Body layer. Expand your selection by 5 pixels (Select/Modify/Expand). Fill your selection with #E4E4E4.
10. Flatten your image (Layer/Flatten Image). Grab your Rectangular Marquee Tool and select the upper part of the tab strokes like in the image below.
 Hit delete to get rid of the selection and then CTRL+D to deselect and you are ready!!!
This is my end result with an added navigation.

Enjoy!!! ;o)

